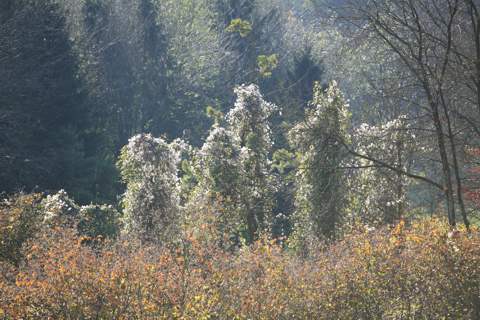
Elsewhere I explain why you cannot tell by looking at the 5D's in-camera histogram whether or not this photograph - or any photograph which has bright highlights that are dispersed in small areas across the picture - is correctly exposed.
The problem is that the in-camera histogram seems not to be calculated from all the pixels in the image and will not correctly show such dispersed highlights.
Here I address the related question of how we could use the 5D's exposure metering facilities to correctly expose such a picture, so that the highlights are not blown out.
We are confronted by a subject with dispersed highlights in it. We want to set the camera so that it will expose this subject reliably without blowing out those highlights.
The 5D has a 35 zone metering system. It will be reading this through the pentaprism when the mirror is down, so it cannot use its 12 million pixel sensors to assess the exposure. This tells us at once that we cannot rely upon any averaging or evaluative exposure mode, because the highlights are likely to be smaller than any of the 35 metering zones.
Clearly, what we would like to do is use the spot metering mode, point the camera at one of the highlights, take a reading off it, set the exposure appropriately by pressing the * exposure-lock button, and then recompose and take the picture.
Surprisingly, this is impossible on the 5D.
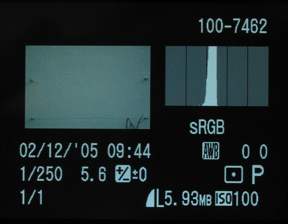
If you take a spot reading with the 5D off a subject of uniform luminance, and use that reading to take a picture, then the 5D will put that subject slap bang in the middle of the camera's dynamic range, which is to say, in the middle of the exposure histogram, like this:-
That is a perfectly reasonable thing for it to do.
However, what we want to do, having taken this spot reading, is expose so that the subject (i.e. the highlight) is over at the righthand end of the histogram, corresponding to pixel values just short of 255. To do this we need to add 3 stops to the metered exposure value.
Unfortunately, we cannot instruct the camera to do this automatically, because the 5D's exposure compensation range is +-2 EV, so it is one stop short of the value required.
Of course, if this were a simple film camera, we could achieve the required exposure offset simply be setting a false ISO film speed value. You can't do that with a digital camera because the ISO setting affects both the metering and the "film" speed at the same time.
Hmm...this is beginning to look really bad. And it gets worse when we remember that with the 5D there is no way in any of the automatic shooting modes (Auto, P, Tv or Av) to change the metered exposure by twiddling any knobs. Yes, there is the "program shift" facility, which enables us to change the aperture/shutter speed combination by turning the Main Dial, but it does so at the same exposure (EV) value, so that's no help here.
Now we're getting pretty desperate, don't you think? Supposing we put the 5D in M for manual exposure, can we solve our problem that way?
Let's work this through, assuming we've already put the 5D in M shooting mode and spot metering mode. What we'd probably like to do is train the camera on the highlight, and press * to lock in that exposure reading. Then we could take the camera away from our eyes and adjust the exposure relative to that locked-in reading. Unfortunately, you can't do that because the * exposure lock facility doesn't work in M mode. The camera is of the opinion, quite reasonably, that the user is setting the exposure in M mode so it can't lock anything. Notice that if we were using a separate exposure meter, it would be possible to lock the reading.
It seems we're going to have to set the exposure whilst the camera is held to our eye and trained on the highlight. Ok then:-
There now, it was easy wasn't it!
It is at this point that I tend to say to myself "I have just paid Canon £2500 for a semi-professional/advanced amateur camera, its got 35 photocells in it and a DIGIC II processor, and it works rather less conveniently than the Canon F1 I bought for £199 in 1972!" See here. That had one CdS photocell and a match needle system.
Not all subjects have dispersed highlights. Perhaps we are over reacting to an unusual situation. Well, I don't think so. I think a camera in this price bracket ought to be able to handle these kind of subjects without resort to ridiculously complicated and unwieldy manual procedures such as I have described above.
I have never used an Olympus camera, but the Olympus E-500 has "highlight spot" and "lowlight spot" metering modes. In the "highlight spot" mode, you take a spot reading off a highlight and it sets the exposure automatically so that the highlight is just not blown out. Likewise, in the "lowlight spot" mode, you take a reading off a shadow area and it sets the exposure so that detail is retained in that area. This facility isn't new; it was in the Olympus OM-4. Why isn't it in the Canon 5D?
Update 20070925. The newly announced Canon EOS 1D mark III has a "highlight tone priority" custom function which, in some undisclosed way, attempts to prevent the blowing out of highlights. Whilst this is welcome, it is not as good as Olympus's "highlight spot" mode because its effect is unclear and not under user control. On the other hand, it presumably works in all metering modes, not just spot.
Notice that, with this Olympus feature, it is a metering mode so you can use it with any of the picture shooting modes (e.g. Av, Tv). Whereas, with the 5D, you're stuck on manual exposure so you've got to do any aperture or shutter priority thinking yourself as well.
Also, I think that the problem I describe here is more general.
For example, here is a photo of my pond taken with an EOS 20D with the exposure set on the normal, default, evaluative mode. The paving stones in the foreground are blown out. To get it right I had to take the shot again after setting -1 EV exposure compensation.
This probably happens because the auto-focus point was in the middle of the pond, and the 35 zone metering system - although it covers the whole of the picture area - probably decides that the pond is the subject and the paving stones don't matter. Perhaps I would have done better to set "centre-weighted averaging" mode, or tilt the camera towards my feet, press * exposure lock and recompose. But these are hit and miss methods.
These problems may well be the reason why it is being said on some forums that with the 5D "you've pretty well got to shoot RAW". With RAW shooting you have a better chance of pulling back blown highlights.
AEB causes three shots to be taken: the first with normal exposure, the second with under exposure, the third with over exposure. The amount of the under and over exposure can be set to any value between 0 and 2 stops. So, for example, if we set AEB to +-2 stops, the camera will take three exposures: (1) 0, (2) -2 EV, (3) +2 EV relative to metered exposure.
If now you also set the normal exposure compensation to, say, +1 stop, then the camera will take exposures derived from the sum of the bracketing and the compensation.Thus it will take the following three exposures: (1) 0+1=+1 EV, (2) -2+1=-1 EV, (3) +2+1=+3 EV relative to metered exposure. The third one of these is what we wanted from the beginning: 3 stops more than metered.
This does allow spot metering to be used in conjunction with non-manual shooting modes and get the right answer. The only problem with it is that you have to actually take three exposures. You have to press the shutter release three times. To help you with this, the * illuminates in the view finder after the first shot, and goes out after the third.
Luckily, the * exposure lock button still works with AEB. So you can set AEB to +-2 EV and exposure compensation to +1 EV, point at a highlight and press *, point the camera anywhere and fire off two shots, then compose and take one shot and - if all is well - that will be the third shot of the bracket with total exposure offset of +3 EV.
Well, I never said it was going to be easy.
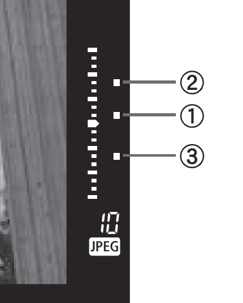
The 1D also has a "multi-spot metering" function, enabling you to take up to eight spot readings from different parts of the subject. The camera then shows those readings in the viewfinder and itself sets the exposure to the average of them. You can then adjust that exposure using the normal exposure compensation control. You can get a PDF of the 1D mark II's instruction manual here.
Photo shows righthand side of EOS 1D mark II's viewfinder display, with three spot readings taken, and shown relative to their average.
It would be nice to think that Canon will realise they have made an unfortunate design error which mars the utility of an otherwise great camera. Perhaps they could mitigate the damage in a new firmware version.
There could be a Custom Function that adds a user-specified exposure compensation amount when the spot metering mode is selected. By setting this to plus (or minus) half the camera's dynamic range, the user could convert the spot metering function into the Olympus "highlight spot" (or "lowlight spot") functions.
The disadvantage of that would be that the normal exposure compensating facility, although it could still work in spot mode, would not be correctly shown in the viewfinder or top LCD displays (due to the fact that they are limited to a +-2 EV scale).
There could be a custom function that simply doubled the range of the normal exposure compensation facility (from +-2 to +-4 EV), with each step in the compensation scale in the viewfinder and the top LCD displays representing twice its normal size. The user would simply have to remember that when these scales show -2..-1..0..+1..+2 they actually mean -4..-2..0..+2..+4.
Do you disagree with any of this? Have you found a better way of solving the problem? Email me at the address below (enable Javascript to see it) and let me know if I may publish your comments on this web site.
Peter Facey, Winchester, England
20070925 updated for EOS 1D mark III
20051204